In the realm of modern residential design, the master bathroom has transformed from a strictly utilitarian space into a private, wellness-focused sanctuary. Homeowners are increasingly looking for materials that evoke the calm, organic atmosphere of a luxury spa. One of the absolute biggest design trends of 2026 is the shift toward seamless, grout-free wall and floor treatments. By incorporating creative microcement bathroom design ideas, you can design a beautiful, tactile retreat that showcases smooth plaster finishes, reflecting light softly and establishing a warm, organic minimalism.
What is Microcement?
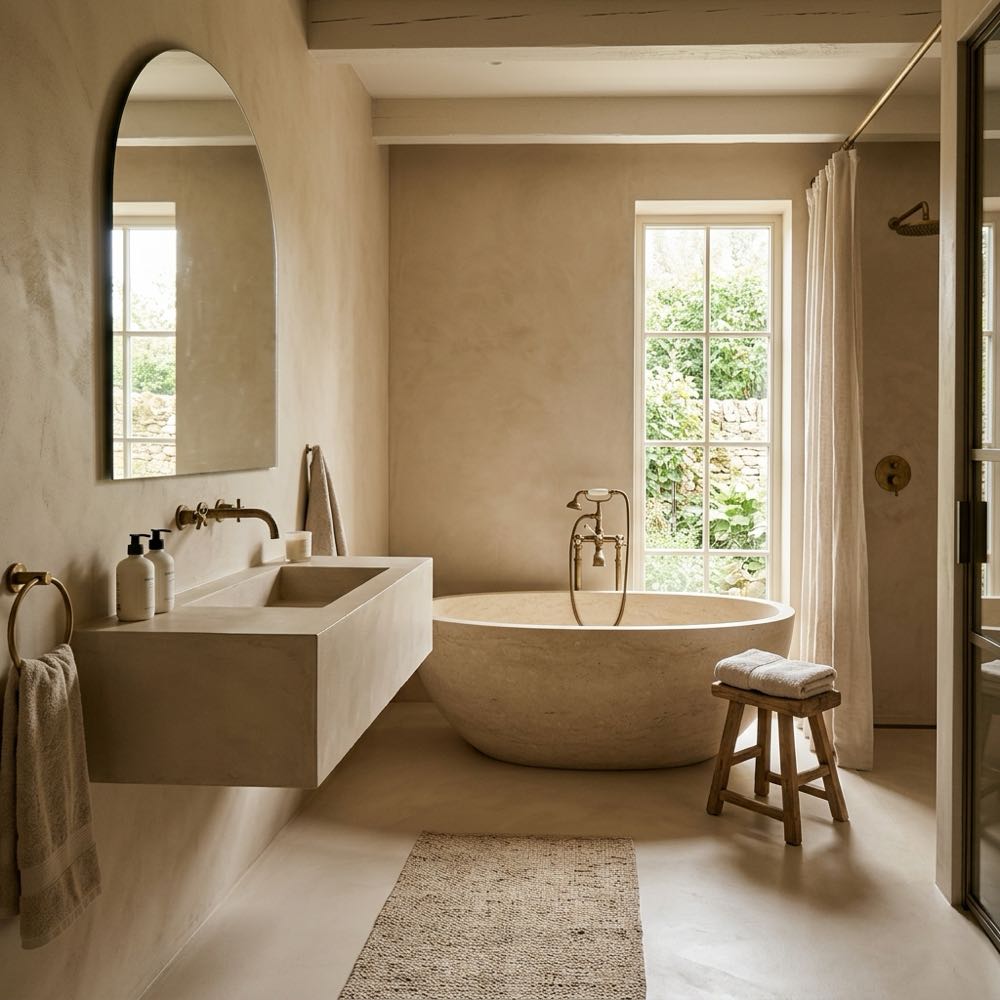
Microcement (sometimes called micro-screed or micro-concrete) is a polymer-modified cement-based coating applied in thin layers to walls, floors, and even custom furniture. Typically measuring only 2 to 3 millimeters in total thickness, this versatile material can be applied directly over existing tiles, drywall, or concrete. Unlike traditional ceramic or porcelain tiles that require grout lines, microcement forms a completely seamless, continuous surface. This lack of joints creates an expansive, monolithic appearance that makes small bathrooms feel significantly larger, while providing a highly hygienic surface that is easy to wipe down and maintain.
1. Choose the Right Color Palette: Sand, Biscuit, and Ochre
The color you select for your microcement will dictate the mood of the entire bathroom. While grey was once the standard for industrial lofts, modern warm minimalism calls for earthy, sand-derived tones. When researching various microcement bathroom design ideas, color selection is the most critical starting step. Choose warm shades like cream ivory, soft biscuit, clay taupe, or a muted sand beige. These colors reflect natural light beautifully and prevent the concrete-based material from feeling cold or sterile, establishing a cozy, grounded base that harmonizes with natural design elements.
2. Create Grout-Free, Seamless Shower Walls
The shower enclosure is the perfect place to showcase the seamless qualities of microcement. Traditional tiled showers are prone to mold and mildew growth within the grout lines, requiring constant scrubbing. Wrapping your entire shower wet zone in microcement eliminates this maintenance hassle. The plaster wraps continuously around corners, niches, and bench seating without any seam breaks. This creates a clean, architectural look that feels like a stone cave or a luxury boutique hotel bath, enhancing the spaciousness and organic quality of the shower zone.
3. Design a Custom Integrated Vanity Sink
Because microcement is hand-applied using a trowel, it can be wrapped around almost any shape, including custom cabinetry. A popular recommendation of microcement bathroom design ideas is creating a floating vanity counter with a fully integrated vessel sink. Built from a wood or moisture-resistant MDF frame, the entire vanity structure is wrapped in seamless microcement. The sink bowl slopes gently toward a hidden slot drain, creating a single, monolithic object that looks like it was carved from a block of raw stone. This integrated look adds immediate luxury.
4. Ensure Proper Substrate Preparation and Mesh Reinforcement
The longevity of a microcement surface depends entirely on the preparation of the sub-wall or subfloor. Any movement in the substrate will cause the thin cement layer to crack. Ensure your wall backing is constructed of thick cement board or moisture-resistant drywall secured tightly to the framing. During the application of the base coat, the installer must embed a flexible fiberglass mesh layer into the wet mortar. This mesh reinforcement absorbs structural movement and prevents hairline cracks from appearing on the finished, polished surface.
5. Apply the Critical Multi-Layer Sealing Process
While microcement is extremely durable, it is naturally porous in its raw state, much like traditional concrete or plaster. In a wet bathroom environment, constant exposure to water, steam, soap scum, and cosmetics will quickly stain the surface and degrade the material if it is not sealed correctly. The sealing process requires applying a specialized primer followed by two to three coats of a high-performance, solvent-based or water-based polyurethane sealer. You can choose between a matte, satin, or gloss finish, though a matte sealer is highly recommended for a natural, earthy plaster-like look. This sealer creates a completely waterproof, non-porous barrier that protects the plaster, prevents staining, and ensures long-term durability, protecting your home’s structural framing underneath.
6. Pair with Unlacquered Brass and White Oak
To balance the smooth, monolithic look of microcement, you must style the bathroom with contrasting natural textures and warm accents. Many modern microcement bathroom design ideas feature unlacquered brass or brushed gold plumbing fixtures. Unlacquered brass develops a lovely, rustic patina over time that coordinates beautifully with the plaster walls. Complete the look by installing floating shelves or a vanity cabinet made from textured white oak. The natural grain of the wood softens the concrete, creating a balanced, spa-like space.
7. Maintain and Clean Microcement Surfaces Correctly
Cleaning microcement is incredibly easy because there are no grout lines or textured joints to scrub. However, you must avoid using harsh chemical cleaners that can chemically strip or damage the protective polyurethane sealer. Never use bleach, vinegar, ammonia, or abrasive scrubbing pads which can scratch the smooth finish. Instead, clean the walls and floors using a soft microfiber cloth or damp mop dipped in warm water and a mild, pH-neutral soap. Applying a specialized protective wax or liquid polish every few months will help maintain the sealer’s water-repellent qualities, prevent limescale buildup, and keep the textured plaster surface looking beautiful and polished for years.
8. Sourcing Materials and Hiring a Skilled Artisan
Microcement is not a standard DIY project; it is an artisanal finish that requires specialized skills and tools. The material is hand-applied using a steel trowel in multiple paper-thin layers, with the trowel marks creating the unique, shaded texture of the finished wall. It is crucial to hire a licensed, professional plasterer who has specific experience applying microcement in wet shower areas. Request to see photos of their past work, read reviews, and verify that they use high-quality, commercial-grade microcement systems to ensure a flat, level, and completely waterproof installation.
Summary: Microcement Bathroom Design Checklist
Plan your grout-free master bath remodel successfully using this checklist compiled from our microcement bathroom design ideas:
| Design Element | Recommended Layout Choice | Interior Design Purpose |
|---|---|---|
| Plaster Shade | Warm sand, creamy biscuit, or clay taupe with a matte finish | Reflects natural light softly and brings organic neutral warmth |
| Reinforcement | Fiberglass mesh embedded in the primary cement base coat | Absorbs minor wall movement and prevents micro-cracking |
| Vanity Style | Floating vanity unit with a fully integrated microcement sink | Establishes a sleek, monolithic visual focal point in the room |
| Sealer Type | Polyurethane-based matte sealer (apply 2-3 coats) | Protects the porous plaster from water, soap stains, and oils |
| Hardware Accent | Unlacquered brass faucets and a textured white oak vanity | Softens the plaster walls with natural aging metal and wood grain |
In conclusion, by utilizing these microcement bathroom design ideas, you can design a gorgeous, grout-free bathroom that serves as a quiet sanctuary. By selecting warm neutral plaster shades, preparing the substrate with reinforcing mesh, sealing the surface with matte polyurethane, and accenting the layout with unlacquered brass and oak, you create a space that feels both modern and timeless. Plan your renovation steps carefully, hire a skilled artisan, protect your finished surfaces, and enjoy the daily luxury and tranquility of your beautifully textured bathroom retreat for years to come.