In contemporary bathroom design, the concept of luxury has shifted from sheer ornamentation to spatial flow, openness, and utility. One of the most sought-after architectural features in high-end master suites today is the combined bathing zone. By merging your shower and freestanding bathtub into a single, cohesive, waterproofed enclosure, a modern wet room layout maximizes floor space, creates a sleek spa-like aesthetic, and enhances accessibility. As interior architects and space planners, we believe this layout represents the future of residential bathroom design.
What is a Wet Room Layout?
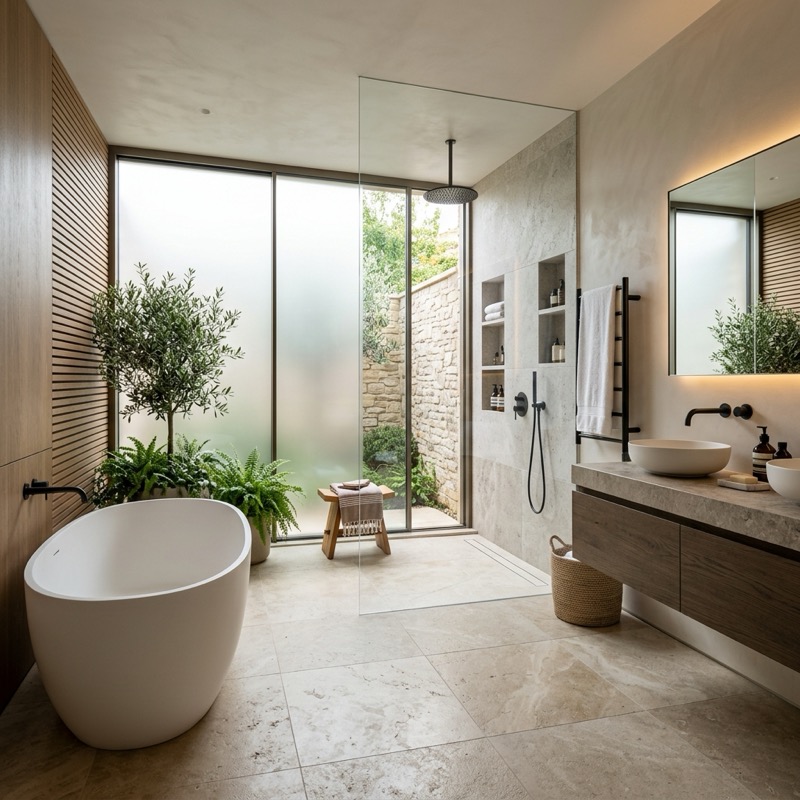
A wet room is a fully waterproofed bathroom where the shower floor sits level with the rest of the room, utilizing a subtle slope to guide water toward a drain. In a residential master bath context, a wet room layout refers to grouping the freestanding tub and the rain shower area inside a single glass-enclosed zone. The entire zone is tanked (waterproofed floor-to-ceiling) and tiled, creating a barrier-free environment. This layout eliminates the need for separate shower stalls and tub decks, making the entire bathroom feel significantly larger and more cohesive, while offering a dramatic visual statement.
1. Maximize Visual Openness with Frameless Glass Panels
The primary design benefit of a combined bathing zone is the feeling of clean, unbroken space. Traditional bathrooms chop up the room with thick tiled walls, shower curbs, and bulky frames. In a well-executed modern wet room layout, you can replace these barriers with a single, floor-to-ceiling sheet of clear, frameless glass. This partition keeps water contained within the wet zone while allowing light and sightlines to flow freely across the entire room. By keeping the visual borders open, the entire bathroom feels like a luxury resort spa, even if the actual square footage is modest, creating a sense of luxury.
2. Choose Durable and Slip-Resistant Tiling
Since the entire floor of the wet zone will be exposed to water, choosing the right tile is the most critical design and safety decision. Large-format porcelain or natural stone tiles are excellent choices for their durability and premium look. However, ensure the tiles have a matte, textured, or slip-resistant finish (a high Dynamic Coefficient of Friction rating) to prevent falls. When laying out the tiles, plan for a gentle slope of at least 1/4 inch per foot leading toward the drain. This ensures that water drains rapidly and does not pool under the bathtub or near the glass entry panel, protecting your subfloor.
3. Position the Bathtub and Shower Head for Optimal Flow
The arrangement of elements within the wet zone dictates how comfortable and functional the space feels. A standard modern wet room layout positions a standalone matte white soaking tub at the back of the wet zone, while the rain shower is placed closer to the glass entry. This sequence allows you to walk into the shower first, leaving the tub as a beautiful architectural focal point at the rear. Ensure there is at least 30 inches of space between the tub and the shower spray zone to prevent the tub from being continuously splashed while using the shower, keeping your tub area clean.
4. Install Linear Drains for Sleek Water Management
Water management is the core architectural challenge of a curbless bathroom. Traditional center drains require the floor to slope inward from all four directions, which restricts your choice to small, highly jointed tiles. To achieve a high-end look, incorporate a linear drain along the rear wall or directly beneath the shower partition. A linear drain only requires the floor to slope in a single direction, allowing you to use gorgeous, large-format tiles throughout the wet zone. This creates a clean, uninterrupted floor plane that enhances the room’s minimalist design, adding modern value.
5. Integrate Recessed Storage Niches for a Clean Look
A luxury spa bath should feel organized and clutter-free, which means avoiding hanging wire baskets or plastic bottle stands. When designing a modern wet room layout, plan for recessed wall niches during the framing stage. Build a long, horizontal niche along the shower wall, lined with the same stone or porcelain tile used on the walls. This provides plenty of storage for shampoos, soaps, and bath accessories, keeping them neatly tucked away and preserving the clean architectural lines of the wet zone. You can also add subtle, waterproof LED strip lighting inside the niche for a high-end look.
6. Waterproof and Tank the Entire Space Thoroughly
Because there is no curb or tray to catch water, waterproofing is the absolute foundation of a curbless bathroom. The process, known as “tanking,” involves applying a continuous waterproof membrane behind the tiles on the floor and walls. In a proper curbless space, we recommend tanking the entire bathroom floor and extending the wall membrane to at least 6 feet high in the shower zone. Use premium waterproofing systems and hire a certified contractor. Investing in proper waterproofing prevents costly moisture damage and mold, ensuring your bathroom remains beautiful and structurally sound for decades.
7. Plan for High-Output Ventilation and Floor Heating
Since a larger volume of water is exposed to the air in a combined bathing layout, managing humidity is essential. Install a high-performance, quiet exhaust fan paired with a timer switch to clear steam and moisture quickly. Additionally, consider installing electric underfloor heating (radiant heating) beneath the bathroom floor tiles. Heated floors provide physical comfort on cold mornings and accelerate the evaporation of surface water on the wet room floor, keeping the space dry, safe, and clean shortly after you finish your shower, reducing cleaning maintenance.
8. Incorporate Floating Vanities and Ambient Backlighting
To complete the open, modern look of your master bathroom, choose a wall-mounted floating vanity instead of a traditional floor-standing cabinet. A floating vanity leaves the floor space beneath it clear, allowing the stone floor tiles to run uninterrupted from the doorway straight into the wet zone, which visually expands the room. Pair the vanity with a large, minimalist mirror featuring integrated LED backlighting. This creates a soft, floating glow that enhances the ambient lighting of the space, making your daily grooming routine feel like a premium ritual.
Summary: Modern Wet Room Design Checklist
Ensure your bathroom remodel successfully incorporates a modern wet room layout using this checklist:
| Design Element | Recommended Layout Choice | Functional/Aesthetic Benefit |
|---|---|---|
| Glass Partition | Single frameless clear glass panel (10mm or 12mm thickness) | Blocks overspray while allowing natural light and sightlines to flow |
| Drain System | Linear drain positioned along the back wall or side wall | Allows one-directional floor slope and use of large-format tiles |
| Flooring Tile | Textured porcelain or natural stone with slip-resistant finish | Prevents slips while creating a durable, spa-like foundation |
| Bathtub Staging | Matte white freestanding acrylic or stone resin soaking tub | Acts as a gorgeous sculptural focal point at the rear of the wet zone |
| Comfort Addition | Electric radiant floor heating cables under the tiles | Keeps floors warm underfoot and accelerates drying of wet surfaces |
In conclusion, choosing a modern wet room layout is a brilliant way to elevate the functionality, value, and aesthetic of your master bathroom. By placing your freestanding bathtub and rain shower inside a single, curbless, waterproofed zone, you create an open, accessible, and high-end spa experience right in your home. Remember to invest in premium waterproofing, select slip-resistant tiles, and utilize a linear drain to enjoy a beautiful, modern bathing environment that will last for years to come.