
Paint Furniture Transformation Guide: Professional Prep, Color Palettes, and Finishing Techniques
Our team at HomeTunez recently took on the challenge of transforming a bulky, dark-stained pine buffet that dominated a client’s dining room. The heavy, orange-toned piece visual weight made the entire space feel dated, small, and gloomy. Many homeowners face this dilemma, wondering whether to discard inherited wood furniture or attempt a paint restoration. In my furniture flipping experience, paint is the single most powerful tool for breathing new life into old frames. Selecting a sophisticated color palette and executing precise prep work can elevate any dated cabinet into a stunning focal point.
Painting furniture is far more than slapping a coat of color onto wood; it is a highly structured technical process. A sloppy paint job looks cheap, showing brush marks, paint drips, and peeling edges after just a few weeks. Achieving a factory-smooth, professional finish requires a deep understanding of paint chemistry, sanding techniques, and substrate preparation. When we began work on the pine buffet, we knew that patience and attention to detail would make the difference. The goal was to replace the heavy, dark presence with a light, modern aesthetic that feels premium and intentional.
We started by removing the outdated brass hardware, documenting every hinge and drawer screw for later reassembly. Cleaning the wood surface was next, stripping away decades of built-in grease, wax polish, and household grime. Sanding the wood flat allowed us to evaluate the base timber and locate any structural flaws. In our design practice, we view these steps as building a foundation for a house; without it, the paint will not adhere properly. By investing time in the early prep phases, we guarantee a finish that resists chipping and scratches.
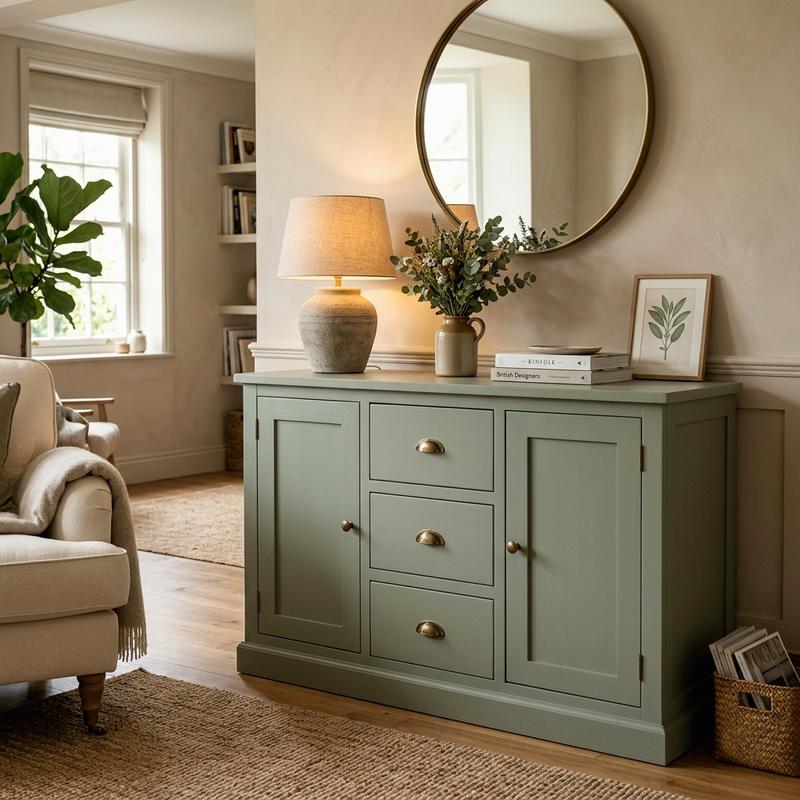
We chose a beautiful, muted clay-green color palette to give the buffet a modern, organic feel that connects with nature. As the first thin coat of paint leveled out, the dramatic change in the room’s energy was immediately clear. The soft green tone reflected light, making the dining room feel airy, spacious, and inviting. Watching a piece of furniture transition from an eyesore into a designer statement is always a thrilling experience. This process demonstrates how paint can bridge historical structure with contemporary aesthetics, creating a truly unique home heirloom.
Selecting the right color palette is crucial for making the painted piece blend seamlessly into your home’s layout. We recommend looking at the room’s natural lighting, wall paint colors, and flooring tones before choosing a paint shade. Warm neutrals, moody charcoals, and earth-toned greens are excellent choices for modern statement furniture. Avoid overly bright primary colors, which can look juvenile and dated on large cabinets. A sophisticated color selection makes the furniture feel custom-made for the space, enhancing the overall interior design.
Material Selection and Durability in Paint Coatings
Selecting the correct paints, primers, and prep products dictates how well your furniture transformation resists daily wear and tear. Cheap latex wall paints will peel off furniture quickly, as they remain rubbery and cannot bond to hard wood surfaces. We start our projects by cleaning the wood base using biodegradable, non-toxic cleaners from Method. These gentle sprays cut through tough wax and hand oils without degrading the wood fibers. Starting with a clean, degreased surface ensures that your primers and paint coats establish a permanent physical bond.
For wooden surfaces that need leveling, or for cleaning between sanding stages, using professional wood care products is essential. We recommend using specialized wood cleansers and sanders from Bona to prepare the base before applying primers. Their products help remove dust and sealers without swelling the wood grain, ensuring a flat, smooth surface. If you are refinishing a piece with a natural wood countertop, protecting the raw wood grain with their durable sealers prevents water damage. Proper surface prep prevents the paint from peeling off from moisture later.
When choosing paint, using premium, high-durability coatings is key to achieving a professional, long-lasting look. We paint our wooden furniture using high-quality low-VOC paints and primers from Farrow & Ball. Their Dead Flat or Modern Eggshell finishes offer outstanding depth of color, excellent self-leveling, and washability. Choosing low-VOC formulas supports your overall air quality goals, which is especially critical for bedroom furniture. This healthy choice coordinates perfectly with modern sustainable bedroom design ideas for non-toxic sleeping environments.
If your painted furniture contains seating cushions or fabric inserts, selecting durable upholstery textiles is vital. Benches, dining chairs, and stools require fabrics that resist spills, friction, and dust build-up. We specify stain-resistant performance fabrics from Crypton for all our interior furniture seating upgrades. Their fabrics feature a permanent moisture barrier that prevents liquids from soaking into the cushion foam, making cleaning fast and simple. This prevents the fabric from staining or growing mold, maintaining a fresh, high-end appearance.
For painted furniture that will be placed outdoors, like patio chairs, garden benches, or porch tables, weather protection is essential. The paint must be outdoor-rated, and any cushions must use textiles designed for sun and rain exposure. We recommend high-performance outdoor fabrics from Sunbrella for all exterior cushions and accent throws. These acrylic fabrics resist UV fading, water penetration, and mildew growth, keeping your patio furniture beautiful. Combining weather-resistant paints with these durable fabrics ensures your outdoor pieces survive the seasons.
Investing in high-quality materials ensures your painted furniture remains beautiful for years without needing touch-ups. Cheap paint formulas chip easily under the impact of vacuum cleaners, toys, and keys, ruining the clean look. Premium finishes cure to a hard shell that resists scratches, color fading, and moisture damage. By choosing the right products, you save time and reduce waste, creating furniture that lasts. Prioritizing durability in your paint transformations creates pieces that serve your family for decades.
Built-In Integrations and Space Optimization
Integrating modern features into your painted furniture elevates its utility while optimizing space in compact rooms. Instead of keeping a cabinet purely traditional, we can modify the interior to serve multiple functions. You can install a hidden charging drawer, routing power cords through a clean pass-through hole in the back panel. Adding low-profile LED strip lights inside cabinets makes it easy to find items in dark corners. These smart upgrades make painted furniture functional and convenient for modern, tech-focused households.
To keep your painting studio or garage workspace secure while these high-value projects cure, smart monitoring is highly recommended. Placing one of the best smart indoor security cameras for home in your drying area allows you to track progress. You can check the paint’s leveling and drying status without opening the door and introducing dust particles. This smart camera setup protects your fresh paint finish, ensuring a clean, dust-free cure. High-definition monitoring provides peace of mind throughout the project.
You can also automate your workspace climate to ensure the paint cures under optimal temperature and humidity conditions. Connecting your workshop exhaust fans, heater, and dehumidifier to smart outlets makes controlling the environment simple. Managing these smart outlets through popular smart home protocols (Zigbee, Z-Wave, Wi-Fi) keeps the room climate perfectly balanced. Stable temperature and humidity prevent paint coats from cracking, bubbling, or drying too quickly. Smart sensors can automatically turn on ventilation when paint fumes reach high levels.
Maintaining a clean painting workshop is vital, especially when dealing with paint splatters and dusty sanding pads. Washing your canvas drop cloths, painter’s overalls, and cleaning cloths regularly keeps your workspace safe and organized. We recommend washing these items with the best eco-friendly laundry detergent sheets to remove paint and dust residues. These biodegradable sheets dissolve fully in cold water, preventing harmful chemicals and microplastics from entering municipal water systems. Keeping your painting gear clean prevents dust from landing on wet finishes.
Placing a freshly painted statement cabinet in your lounge is a fantastic way to upgrade the space. Incorporating these colorful, customized furniture pieces is one of the most effective budget-friendly modern living room decor ideas. A painted credenza or sideboard serves as an eye-catching focal point, anchoring the room layout. It provides excellent storage for electronic media, board games, and blankets, keeping your common areas tidy. The clean, painted surfaces combined with modern hardware give the entire room a premium feel.
Optimizing the storage inside painted furniture involves using adjustable shelving, shallow drawers, and pull-out trays. For a painted buffet, converting central shelves into pull-out spice racks or bottle organizers maximizes space. You can also paint the cabinet interiors in a contrasting color to add visual depth when doors are opened. Using vertical pegboards inside doors provides additional hanging space for tools or utensils. These small, creative alterations turn a simple painted cabinet into an indispensable storage solution for your home.
Comparing Paint Formulas and Finishes
To help you choose the best paint type for your furniture project, our team at HomeTunez has evaluated five common options. Each paint formula has different material costs, preparation levels, durability, and drying times. By comparing these properties, you can select the correct product for your wood substrate and usage needs. Painting furniture requires matching the coating to the item’s daily wear and tear. Some paints offer ease of application with minimal sanding, while others require extensive prep but deliver a hard finish. Reviewing these factors helps you plan your tools and budget before starting.
| Paint Type | Est. Cost / Quart | Durability Level | Prep Level Required | Skill Level | Best Application |
|---|---|---|---|---|---|
| Chalk Paint | $35 – $50 | Good (Requires wax topcoat) | Low (No sanding needed) | Beginner | Vintage, Distressed, Matte look |
| Fusion Mineral Paint | $45 – $60 | Very Good (Built-in topcoat) | Medium (Needs clean surface) | Beginner to Intermediate | Modern Matte, Solid colors |
| Milk Paint (Powder) | $25 – $40 | Good (Requires sealer) | Medium (Needs bonding agent) | Intermediate | Rustic, Chippy, Textured look |
| Acrylic Alkyd Enamel | $30 – $55 | Excellent (Cures to hard shell) | High (Needs sanding & priming) | Intermediate to Advanced | Kitchen cabinets, Trim, Dining tables |
| Polyurethane Trim Enamel | $40 – $70 | Outstanding (High scratch resist) | High (Needs sanding & priming) | Advanced | Heavy-duty office desks, Shelves |
Selecting the right furniture paint depends on the piece’s location and usage. For high-traffic surfaces like dining tables, kitchen cabinets, or writing desks, acrylic alkyd enamel or polyurethane trim enamel offers the best scratch resistance. Bedroom dressers, decorative side tables, and picture frames are excellent candidates for chalk paint or milk paint, which offer easy application and classic matte finishes. Understanding these paint formulas ensures your furniture looks professional and performs reliably. By matching the paint to the project, you save time, reduce material waste, and achieve a beautiful finish.
Step-by-Step DIY Implementation Guide
Painting a wood or laminate cabinet is a highly rewarding DIY project that lets you completely update your interior style. This step-by-step guide walks you through the professional techniques needed to achieve a flawless, factory-smooth finish. Follow these phases carefully to ensure your painted furniture remains durable, functional, and beautiful for years.
Phase 1: Disassembly & Degreasing
Begin by removing all cabinet doors, drawers, and hinges to make painting easier. Store all screws, brackets, and pulls in labeled containers to ensure you do not lose them. Clean all wooden and laminate surfaces using a heavy-duty degreasing cleaner and warm water. Accumulations of hand oils, grease, and wax polish will prevent paint from bonding, leading to peeling. Wipe the cabinet dry with a clean cloth and let it dry completely before sanding. Failing to degrease is the most common cause of early paint failure, so take your time to scrub every corner.
Phase 2: Sanding & Creating Mechanical Tooth
Sanding is essential to create a rough texture, or mechanical tooth, for the primer to grip. For laminate furniture, sand gently with 150-grit sandpaper, being careful not to sand through the plastic layer. For wood furniture, sand with 120-grit paper to remove old varnishes, then smooth the surface with 180-grit paper. Always sand in the direction of the wood grain to avoid deep scratches. Wipe away all sanding dust using a clean tack cloth. Ensure the surface is completely dull, as primer cannot adhere to glossy wood varnishes or slick laminate sheets.
Phase 3: Adhesion & Tannin-Blocking Primers
Apply a coat of high-quality adhesion primer using a foam roller or synthetic brush. For raw wood or open-grained wood species like oak, use a shellac-based or oil-based primer to block wood tannins. Tannin bleed will cause yellow or brown stains to appear through your paint, especially if using light colors. Let the primer dry completely according to the manufacturer instructions. Sand the primed surface lightly with 220-grit sandpaper to smooth out any bumps, then wipe away dust. A second primer coat may be needed for highly porous wood grains.
Phase 4: Paint Application
Stir your paint thoroughly and pour a small amount into a paint tray. Apply the paint in thin, even coats using a high-quality microfiber roller for flat surfaces and a synthetic brush for corners. Thin coats dry faster and level out better, reducing the appearance of brush strokes. Let the first coat dry completely, then sand lightly with 320-grit sandpaper to remove any lint or bumps. Wipe away dust with a tack cloth before applying the second coat of paint. Sanding between coats is the secret to a smooth finish.
Phase 5: Topcoat Protection & Curing
If using chalk or milk paint, protect the surface by applying two coats of furniture wax or poly sealer. For alkyd paints, a separate topcoat is not needed, but letting the paint cure is critical. Curing is different from drying; while paint dries in a few hours, curing takes two to four weeks. During this time, the paint hardens to its maximum durability. Avoid placing heavy objects or scraping keys on the surface during the curing phase. Reassemble hardware and doors. Enjoy your newly transformed, factory-smooth cabinet statement piece.
Once the curing phase is complete, your painted cabinet will be fully ready to handle daily use. You can clean it regularly using mild soap and a damp cloth, avoiding abrasive pads that can scratch the finish. The smooth, hard surface will resist dust and fingerprints, keeping your home looking clean and organized. By following these professional steps, you have successfully transformed an outdated piece of furniture into a premium, durable design statement. Your patience and hard work have yielded an heirloom that matches your modern style perfectly.
Frequently Asked Questions
What is the difference between chalk paint and mineral paint?
Chalk paint dries to a very chalky, ultra-matte finish and requires a separate wax or poly topcoat for protection. Mineral paint features built-in topcoats that cure to a durable, washable satin finish without extra sealers. Chalk paint is easier to distress for a rustic look, while mineral paint self-levels exceptionally well for a modern, smooth appearance. Choose the formula that matches your desired furniture style and durability needs.
Do I really need to sand furniture before painting it?
Yes, sanding is essential for creating a rough texture that allows primers and paint to adhere. Glossy varnishes and slick laminate surfaces are too smooth for paint to grip, leading to peeling and chipping over time. You do not need to strip the wood to raw timber; a light scuff-sanding with 150-grit sandpaper is enough to break the gloss. Taking time to sand ensures a long-lasting painted finish.
How can I prevent paint from scratching off laminate furniture?
Prevent paint from scratching off laminate by using a high-quality bonding primer designed for slick, non-porous surfaces. Scuff-sand the laminate surface gently with 150-grit sandpaper before priming to create a physical grip. Apply the primer in thin coats and let it dry completely before applying your topcoat. Using durable alkyd enamel paint and allowing it to cure for several weeks will create a hard shell that resists scratches.
What causes paint to bleed through, and how do I stop it?
Paint bleed-through is caused by water-soluble wood tannins or old oil stains migrating through the paint layers, creating yellow stains. This issue is common in mahogany, cherry, oak, and pine furniture. Standard water-based primers cannot block these oils, so you must use a shellac-based or oil-based primer. Apply two coats of specialty primer over the stained areas, sanding lightly between applications, to lock the tannins in.
Is a paint sprayer better than a brush and roller for furniture?
A paint sprayer is excellent for achieving a seamless, factory-smooth finish without brush marks, especially on detailed trim. However, sprayers require extensive masking prep, cleanup time, and a dedicated workspace to manage overspray. A high-quality microfiber roller and synthetic brush are cheaper, easier to control, and can produce a beautiful finish when using self-leveling paint. Choose the application tool that matches your experience and workspace.
How do I get rid of brush strokes in my painted finish?
Avoid brush strokes by using a high-quality synthetic-bristle brush and applying paint in thin, even coats. Avoid brushing over paint that has already started to dry, as this drags the paint and creates ridges. Using self-leveling paint formulations, such as acrylic alkyds, helps brush marks flatten out naturally. Sanding the surface lightly with 320-grit sandpaper between coats removes any ridges, ensuring a smooth final layer.
How long should I wait between coats of paint on furniture?
You should wait at least two to four hours between coats of water-based paint, depending on humidity and temperature. Oil-based paints and primers require twelve to twenty-four hours of drying time before re-coating. Sanding or painting too quickly blocks moisture inside, leading to a soft, gummy finish that peels easily. Always follow the manufacturer guidelines on drying times to ensure each layer dries and bonds correctly.
Do I need to seal painted furniture with wax or polyurethane?
Yes, chalk and milk paints must be sealed with furniture wax or polyurethane to protect the chalky finish from stains and moisture. Acrylic latex and mineral paints do not require a separate sealer, though applying a clear topcoat improves scratch resistance on tabletops. If your painted furniture is placed in a high-traffic area, sealing it with a water-based polyurethane keeps the paint looking fresh.
What is the best way to paint metal hardware on furniture?
Paint metal hardware by removing it from the furniture and cleaning it thoroughly with soapy water or mineral spirits. Sand the metal surface lightly with steel wool or fine sandpaper to create a mechanical grip. Apply a metal-specific primer, followed by two thin coats of durable metallic spray paint. Let the hardware dry completely before screwing it back onto your painted cabinet to prevent scratching.
How long does painted furniture take to cure before heavy use?
Painted furniture takes about two to four weeks to cure to its maximum hardness, even if it feels dry to the touch. During this curing phase, the paint binder molecules cross-link to form a tough, scratch-resistant barrier. Avoid placing heavy items, hot cups, or laptops on your painted surfaces during this time. Treating the furniture gently during the first month prevents deep marks and peeling.
Design Summary
Painting furniture is a highly effective design strategy that turns outdated, dark wood furniture into modern, custom-styled statement pieces. In my furniture flipping experience, the key to a professional finish lies in careful preparation and high-quality materials. By scrubbing away grease with Method cleaners and using scuff-sanding techniques, you create the mechanical grip needed for lasting paint adhesion. Using premium finishes from Bona and Farrow & Ball ensures that your transformed buffet or cabinet features deep, rich colors that resist scratches and daily wear.
Additionally, integrating smart features like hidden power hubs and automated lighting makes your painted furniture highly functional for contemporary homes. The choice to paint is also an eco-friendly option that aligns with larger sustainable design practices, keeping solid timber structures out of landfills. Whether you are painting a matching set of bedroom nightstands or a bold living room credenza, these professional steps guarantee success. Your finished piece will serve as a gorgeous focal point that elevates the look and organization of your home.
Taking a slow, technical approach to your paint transformations guarantees a factory-smooth finish that feels premium and custom-designed. By matching the correct paint type to the furniture’s daily use, you protect the surfaces from premature chipping and wear. When you look at a completed painted sideboard, you see a story of restoration that matches your personal taste. Investing time in sanding, priming, and curing transforms ordinary thrift store finds into valuable heirloom pieces. These statement items will serve your household beautifully for many years.
To learn more about optimizing your space, explore our guide on Smart Home Tech for Seniors.
For additional tips on creating a beautiful home, read our article about Non-Slip Flooring Solutions.
If you are planning a renovation, you might also find our ideas on Wheelchair Accessible Bathroom Design helpful.