In contemporary kitchen design, the kitchen backsplash has evolved from a functional splash guard into a major artistic focal point. As homeowners move away from uniform, mass-produced subway tiles, they are seeking materials that bring soul, character, and texture into their culinary spaces. The absolute top choice for organic luxury in 2026 is Moroccan clay tile. By reviewing creative zellige tile kitchen backsplash ideas, you can design a beautiful kitchen wall that showcases raw, handmade variations, reflecting light in a way that modern machine-cut tiles simply cannot replicate.
What is Zellige Tile?
Zellige is a traditional, handmade clay tile crafted in Morocco, using methods that have remained unchanged for centuries. Natural clay is mixed with water, hand-molded into squares, air-dried, glazed, and fired in coal-fueled kilns. This artisanal process results in beautiful, unique irregularities—each individual tile features subtle variations in color tone, minor chips, slight cracks, and uneven surfaces, ensuring that no two tiles are exactly identical. When installed side-by-side, these imperfections catch natural light from different angles, creating a shimmering, liquid-like surface that brings incredible warmth and life to your kitchen, making it feel organic.
1. Embrace Color Variations for a Textured Surface
The beauty of Moroccan clay tiles lies in their diverse color shading (known as “nuance”). Even if you order a single box of white tiles, you will find shades of cream, grey, beige, and soft pink inside. Do not try to sort through the box to find matching tiles. The best zellige tile kitchen backsplash ideas encourage mixing different shades randomly during installation. This color variation is what gives the finished backsplash its unique depth and texture. For a bold look, choose olive green, terracotta, or cobalt blue tiles; for a softer, organic look, choose off-white or light sand tones.
2. Choose a Curled-Edge Butt-Joint Installation
Unlike traditional ceramic tiles, which require plastic spacers to create wide, uniform grout lines, Moroccan Zellige tiles are installed edge-to-edge (known as a “butt joint”). The tiles are placed directly against each other with almost no gap. Any minor spaces resulting from the irregular, hand-cut edges are filled with a thin, watery grout. This tight installation technique creates a continuous, tapestried wall of tile that highlights the handmade nature of the clay, rather than framing each individual square with a thick grid of grey or white grout lines, preserving raw aesthetics.
3. Select the Right Grout Color and Consistency
Because Zellige tiles are placed edge-to-edge, selecting the right grout is a critical design choice. Avoid using heavily contrasting grout colors. If you are installing off-white tiles, choose a grout that matches the clay tone, such as biscuit, cream, or light beige. This ensures the grout lines blend into the background, allowing the glossy glaze and color variations of the tiles to take center stage. Additionally, ensure the installer uses a non-sanded grout to prevent scratching the delicate glazed surface of the tiles during application, maintaining safety.
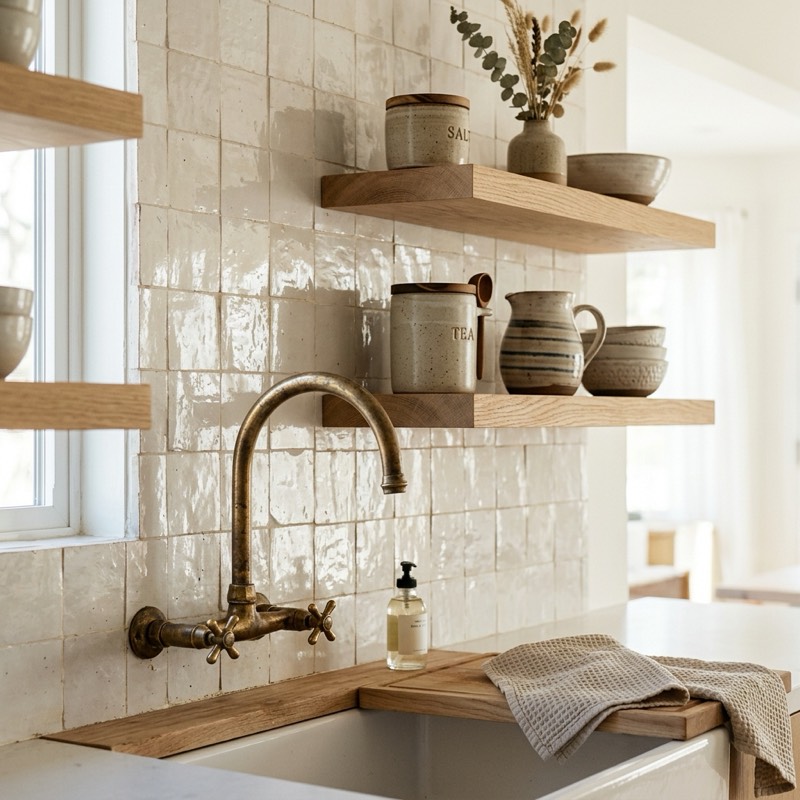
4. Stage with Unlacquered Brass and White Oak
Moroccan clay tiles have a warm, organic feel that pairs beautifully with other natural materials. As space planners, we suggest staging your Zellige backsplash with unlacquered brass kitchen faucets and hardware. Unlacquered brass develops a lovely, rustic patina over time that coordinates with the handmade tiles. Complete the look by installing thick floating shelves made from white oak or raw cedar directly over the backsplash. Display hand-thrown pottery, clear glass jars, and small cutting boards on the shelves to showcase a clean, cohesive design.
5. Extend the Tile to the Ceiling for Maximum Impact
Many standard kitchen layouts only run the backsplash tile up to the bottom of the upper cabinets, leaving a boring drywall strip. However, to create a premium, high-end feel, consider running the Zellige tile all the way to the ceiling line. This vertical extension creates an impressive feature wall that acts as the primary visual anchor of your kitchen layout. By wrapping the window frames, plumbing chases, and range hood area in shimmering tile, you maximize the light-reflective qualities of the glaze, making the entire kitchen feel brighter, taller, and significantly more spacious, integrated, and custom-designed, adding immediate real estate value to your home.
6. Seal the Tiles Correctly for Maintenance and Cleaning
Since raw clay is porous, the glaze on Zellige tiles protects the front surface from stains and water. However, the exposed, hand-cut edges and the grout lines still require protection. To prevent oil and water from soaking into the wall behind your stove, apply a high-quality, penetrating sealer shortly after grouting. For daily cleaning, avoid harsh chemical sprays or abrasive sponges that could scratch the glaze. Instead, wipe the backsplash down with a soft microfiber cloth dipped in warm water and a mild, pH-neutral dish soap.
7. Combine with Durable Stone Countertops
To ensure your kitchen design feels balanced, pair the highly textured backsplash with a smooth, durable countertop material. Because Zellige tiles have a lot of visual motion, choose countertops with subtle, quiet patterns. Quartz, quartzite, or dark soapstone slabs with clean, thin veining are excellent choices. When matching tiles to countertops, these zellige tile kitchen backsplash ideas help prevent visual clashing by choosing low-contrast quartz that grounds the shimmering wall. This pairing allows the backsplash to serve as the main star, while the counters remain highly functional. This contrast between the organic, shimmering texture of the handmade tiles and the smooth, solid slab surface is key. Choosing a countertop with too much heavy veining will create visual competition, making the kitchen feel crowded and distracting. By keeping the counters quiet, you create a dedicated stage for the zellige tiles to shine.
8. Professional Installation and Acclimation Advice
Moroccan tiles are artisanal products, and installing them requires specialized skills. Before installation, unbox all the tiles and mix them together from different boxes to ensure a balanced distribution of color nuance. Soak the tiles in clean water for 1 to 2 hours before laying them to prevent the porous clay from sucking the moisture out of the thinset mortar, which could weaken the chemical bond. Always hire a professional tile installer who has specific experience working with hand-cut Moroccan clay, as they will know how to handle the irregular edges, varying tile thicknesses, and curved corners that define this organic product.
Summary: Zellige Backsplash Design Checklist
Plan your kitchen remodel successfully using this checklist from our zellige tile kitchen backsplash ideas:
| Design Element | Recommended Layout Choice | Interior Design Purpose |
|---|---|---|
| Tile Shade | Off-white, cream, or soft sand tones for neutral warmth | Reflects natural light and provides a soft, organic texture |
| Thinset Method | Edge-to-edge butt-joint layout with no plastic spacers | Creates a continuous tapestried wall, highlighting irregularities |
| Grout Selection | Non-sanded grout in a matching warm neutral tone | Blends into the tiles and prevents scratching the glossy glaze |
| Hardware Accent | Unlacquered brass plumbing and oak floating shelves | Brings natural aging metal patina and warm timber contrast |
| Tile Height | Extended all the way from counters to the ceiling line | Establishes a grand architectural feature wall in the room |
In conclusion, researching and implementing creative zellige tile kitchen backsplash ideas is an exceptional way to bring handcrafted warmth and organic texture to your kitchen. By embracing color variation, choosing a tight butt-joint installation, and pairing the tiles with unlacquered brass and oak shelving, you can create a gorgeous feature wall that will capture light and make your kitchen feel like a high-end, inviting culinary retreat. Plan your project, prepare your drywall, and celebrate the beauty of handmade design.