Among the many smart home upgrades available to homeowners today, security devices like cameras and smart locks often get the most attention. However, there is a hidden threat that causes far more financial damage to properties every year: plumbing leaks. Water damage from burst pipes, failing water heaters, or slow appliance leaks can cost thousands of dollars to repair and cause massive structural disruptions. By reading and following this comprehensive smart water leak detector guide, you can understand how to protect your home, choosing and positioning smart sensors that will notify you the second water is detected.
Why Water Leak Detectors are Essential
Unlike smoke alarms, which are required by building codes in almost every home, water leak detectors are a voluntary upgrade. However, statistics show that a home is ten times more likely to experience water damage than fire damage. A slow leak behind a wall or under a sink can go unnoticed for months, leading to wood rot, toxic mold growth, and weakened drywall. Smart leak sensors solve this problem by monitoring high-risk plumbing zones 24/7. When water contacts the metal pins on the bottom of a sensor, the device instantly sends an alert to your smartphone, allowing you to act immediately. This rapid notification helps you minimize restoration costs and keeps your home dry and safe.
1. Choose Between Wi-Fi, Zigbee, and Z-Wave Protocols
Smart leak sensors are available in several communication protocols, and your choice will dictate how they connect to your smart home. Wi-Fi sensors are the easiest to set up, connecting directly to your home router without needing a dedicated smart home hub. However, they consume more battery power and can drop offline if your Wi-Fi is weak. Zigbee and Z-Wave sensors require a compatible hub, but they use very little power, allowing the sensor batteries to last for several years. Selecting the right protocol is the first crucial step in establishing a reliable water safety network throughout your property, ensuring constant uptime.
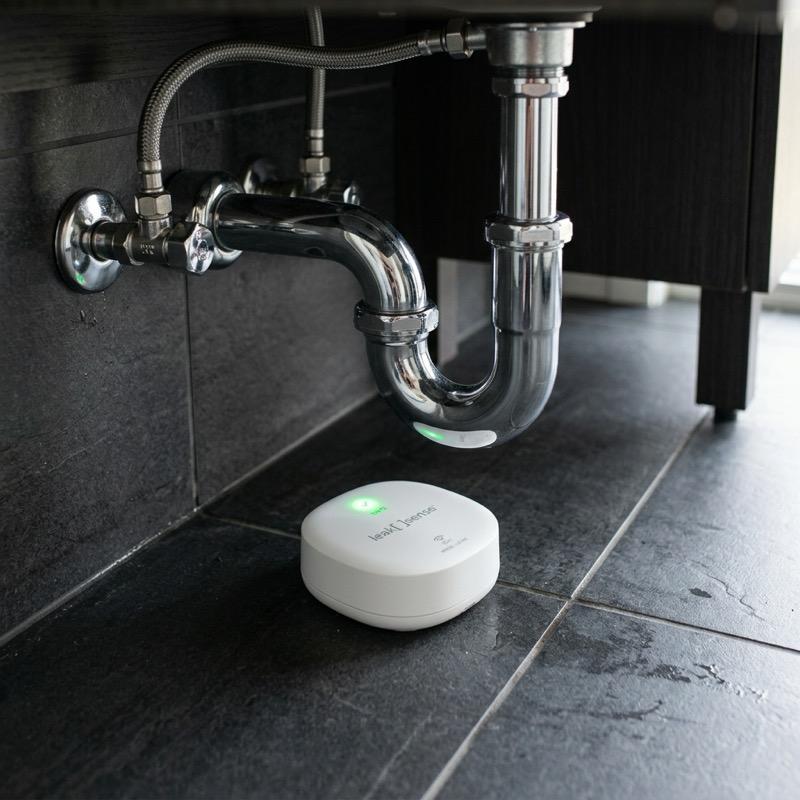
2. Position Sensors in High-Risk Plumbing Silos
To build a robust safety net, sensors must be positioned strategically. As space planners, we suggest placing sensors in locations where plumbing lines are most vulnerable. Place a sensor on the floor directly beneath your kitchen sink, bathroom vanities, and behind the toilet. These are common sites for slow connection leaks. Next, place a sensor near your washing machine and water heater. Water heaters have a lifespan of about 8 to 12 years and often fail by leaking from the bottom, making them prime candidates for automated monitoring to prevent room flooding, which can damage floors.
3. Invest in an Automatic Water Shut-Off Valve
While receiving a smartphone alert about a water leak is helpful, it may not prevent damage if you are away from home or sleeping. For complete peace of mind, this smart water leak detector guide recommends pairing your floor sensors with a smart automatic water shut-off valve. This device is installed on your home’s main incoming water line. When any individual floor sensor detects water, it sends a signal to the shut-off valve, which automatically closes the main water line within seconds, stopping the flow of water and preventing catastrophic flooding before it can even start. This is the ultimate tier of home plumbing protection.
4. Integrate Sensors into Your Main Smart Home Hub
To maximize the utility of your sensors, integrate them into a central smart home ecosystem like Apple Home, Google Home, Samsung SmartThings, or Home Assistant. This integration allows you to create custom automation routines and smart scripts. For example, you can program your system so that if the washing machine sensor detects water, it immediately cuts the power to a smart plug controlling the washer, preventing more water from pumping out. You can also set your smart lighting system to flash red throughout the house if a leak is detected during the night, alerting you instantly, which is highly practical and increases your chances of stopping the leak before it spreads.
5. Test the Sensors and Check Batteries Regularly
Like smoke alarms, water leak sensors are “set-it-and-forget-it” devices, which means they can be easily neglected. To ensure they work when needed, establish a regular maintenance routine. Test each sensor every six months by placing a damp paper towel across the metal contact pins. The sensor should trigger an alert on your phone within seconds. Clean the contacts to remove any dust or mineral buildup that could block water contact. Also, monitor the battery levels in your smart home app, and replace batteries immediately when they drop below twenty percent to ensure continuous safety.
6. Utilize Cable Sensors for Narrow and Hard-to-Reach Areas
Standard puck-style sensors are excellent for flat, open floors, but they can be difficult to position in tight spaces. For areas like the narrow gap behind a washing machine, under a dishwasher, or along the base of a water pipe, look for sensors that support add-on cable extensions. These thin, flexible cables are fully water-sensitive along their entire length. You can lay the cable flat along the floor or wrap it around a pipe joint. This ensuring that any drip, no matter where it lands, will be caught instantly, providing superior coverage for complex plumbing setups, reducing risks.
7. Consider Environmental Factors and Temp Sensors
Many modern smart leak sensors do more than just detect liquid water; they also monitor temperature and humidity. Placing a sensor in your basement or crawlspace can alert you if the temperature drops close to freezing, indicating that your pipes are at risk of bursting. In this smart water leak detector guide, we suggest using these multi-functional sensors in unheated rooms, basements, attics, or near exterior walls. This proactive temperature monitoring allows you to turn on heating, open faucets to keep water moving, or receive warning notifications before freeze damage can occur, offering a double layer of safety for your entire household.
Summary: Leak Detector Placement Checklist
Protect your home from water damage by referencing this checklist from our smart water leak detector guide:
| Sensor Location | Recommended Staging Choice | Specific Plumbing Risk |
|---|---|---|
| Kitchen Sink Cabinet | Puck sensor flat on cabinet floor near drain pipe | Slow joint leaks or garbage disposal vibration failures |
| Water Heater Base | Cable sensor wrapped around base or puck in drain pan | Tank corrosion ruptures resulting in continuous hot water flow |
| Washing Machine Rear | Cable sensor laid along the floor beneath hose connections | High-pressure water supply hose cracking or internal pump seal failure |
| Bathroom Vanities | Puck sensor near hot/cold shut-off valves | Corroded braided metal supply lines leaking behind cabinets |
| Refrigerator Ice Maker | Thin cable sensor behind the fridge unit | Plastic water line pinhole leaks damaging hardwood flooring |
To finish, taking the time to read a comprehensive smart water leak detector guide and installing sensors is one of the smartest investments you can make in your home’s long-term safety and structural integrity. By choosing the right connection protocol, placing sensors in high-risk zones, and pairing them with a smart automatic shut-off valve, you can prevent minor drips from turning into expensive disasters. Keep your system updated, test your sensors regularly, and enjoy the comfort of knowing your property and your family are protected day and night from unexpected water emergencies.
To learn more about optimizing your space, explore our guide on Smart Mirror Workout Home Gym Tech.
For additional tips on creating a beautiful home, read our article about Smart Home Wall Mount Control Panel Ideas.