
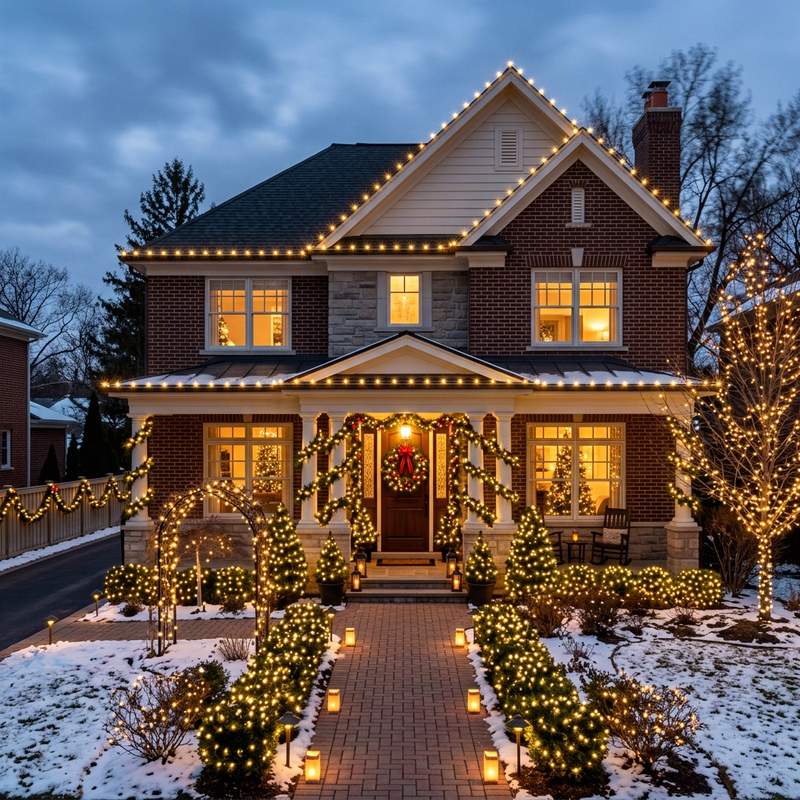
As the holiday season approaches and the winter nights grow longer, the tradition of illuminating our homes becomes a central focus of seasonal home styling. A beautifully planned outdoor lighting display does more than just add festive cheer. It highlights the architectural lines of your home, brightens the dark winter landscape, and offers a warm, glowing welcome to friends and family. However, a poorly installed display can look messy, damage your gutters, or introduce safety hazards. In this comprehensive guide, we will share the art of professional lighting design and detail five setup tips for your Holiday Lighting and Outdoor Display, helping you design a clean, safe, and truly stunning winter display that showcases your home’s exterior.
The Architecture of Lighting Design: Balance and Safety
In our exterior design practice, we always start by analyzing the architectural lines of the house. Outdoor lighting should highlight, not hide, your home’s features. This means installing lights along major structural lines, such as your roofline, porch pillars, windows, and front doorway. By aligning your lights with these architectural features, you create a balanced, clean, and professional look that frames your home beautifully, rather than creating a random cluster of lights.
One of the most important concepts in outdoor lighting is “Visual Balance.” Avoid combining conflicting light colors and flash patterns. Modern high-end displays focus on a single color temperature, typically warm-white LEDs (around 2700K to 3000K). Warm-white lights cast a soft, golden glow that matches candlelight and looks sophisticated. Keep the display static rather than using fast flashing settings, creating a calm, elegant look that welcomes your guests and coordinates with your landscaping.
Additionally, electrical planning and safety are critical for outdoor displays. Because these lights are exposed to rain, snow, and freezing wind, you must use commercial-grade, weatherproof equipment. Work with a licensed electrician to verify your outdoor Ground Fault Circuit Interrupter (GFCI) outlets are working correctly and have watertight covers. Using the right cables and power management tools prevents electrical shorts, protecting your home and family throughout the winter season.
5 Professional Setup Tips for Holiday Displays
1. Commercial-Grade LED C9 Roofline Installations
The roofline is the foundation of your holiday display, and it should look straight, clean, and bright. For a professional look, choose commercial-grade C9 LED light strings. C9 bulbs are large, durable, and feature screw-in bulbs that can be easily replaced. Avoid cheap, thin wire lights that tangle easily and sag along the roofline.
Select C9 LED bulbs in a warm-white color with faceted covers, such as those from Minleon LED or GE Holiday Lights. Mount the strings along your gutters and shingles using durable plastic all-in-one light clips. These clips hold each bulb straight and secure, preventing sagging and keeping your roofline looking clean and sharp. Space the bulbs evenly—typically twelve inches apart—creating a classic, tailored border around your home.
2. Wrapped Porch Pillars and Columns
Wrapping your front porch pillars or columns with lights adds vertical interest and frames your entryway beautifully. To execute this, use commercial-grade 5mm wide-angle conical LED light strings. Conical LEDs feature a curved lens that scatters light in all directions, making the string look incredibly bright and full from any angle.
Choose warm-white conical LEDs and wrap them tightly around your pillars, keeping a consistent spacing of three to four inches between each wrap. Secure the ends of the light strings with rubber-insulated zip ties or command clips to prevent them from sliding down the post. This wrapped design highlights the vertical structure of your porch, creating a warm, glowing frame that welcomes your guests in the evening.
3. Watertight Power Connections and Extension Cord Routing
Exposed electrical plugs are the most common cause of holiday light failures. When water or melting snow enters a plug connection, it causes a short circuit, tripping your GFCI outlet and turning off your display. To prevent this, use watertight cord connection protectors on all outdoor plugs.
The Weathertight Outdoor Extension Cord Cover is a durable plastic capsule that seals plug connections, keeping them dry and safe from moisture. Use heavy-duty, outdoor-rated 12-gauge extension cords in green or black to blend in with your grass and mulch. Route the cords along the base of your foundation wall and secure them with sod staples to keep them flat and prevent tripping hazards, keeping your yard safe.
4. Smart Outdoor Timers and Automated Scheduling
Manually plugging in your holiday lights every evening is inconvenient and wastes energy. To automate your display, connect your outdoor power cords to a smart, weather-resistant outdoor plug timer. Smart timers allow you to control your lights from your phone and schedule them to turn on and off automatically.
The Lutron Caseta Wireless Outdoor Smart Plug is a highly reliable option, featuring a watertight design and support for scheduling based on sunset and sunrise. Program your display to turn on at sunset and turn off at midnight, saving energy and extending the life of your LED bulbs. You can also integrate the smart plug with your indoor holiday lighting, allowing you to control your entire display with a single tap.
5. Illuminated Door Wreath and Landscaping Uplights
To complete your holiday display, add a central focal point at your front door and highlight your yard landscaping. Hang a large, pre-lit pine wreath on your front door, and wrap the door frame in matching pine garland. Use battery-operated lights with built-in timers for the wreath to avoid running messy cords across the doorway.
Additionally, place a few temporary green or warm-white LED spotlights in your garden beds, angling the light upward into your evergreens or deciduous trees. This uplighting technique highlights the natural texture of your trees and adds depth to your front yard, making your holiday display look like a professional landscape design project rather than a simple string of lights.
Comparison of Holiday Light Bulb Types and Applications
| Bulb Type & Shape | Ideal Application | Brightness & Effect | Key Installation Tool | Recommended Brand |
|---|---|---|---|---|
| C9 Faceted LED | Rooflines, gutters, large trees | Bright, classic, large focal border | All-in-one shingle/gutter clips | Minleon Commercial C9 |
| 5mm Conical LED | Pillars, tree trunks, thick garland | Crisp, directional, very full sparkle | Insulated zip ties & command hooks | GE Holiday LED 5mm |
| M5/Mini LED | Wreaths, indoor trees, window borders | Soft, traditional glowing look | Suction cups & floral wire | Minidoka LED Mini Strings |
| LED Spotlight | Landscape trees, house facade | High intensity, wide wash effect | Ground spikes & watertight cords | Lutron Automated Spotlight |
A Step-by-Step Guide to Planning Your Roofline Lighting
To install your roofline lights safely and cleanly, follow this simple four-step process. First, measure the total length of your gutters and shingles to determine the required light string length. Fluff the cords and replace any broken bulbs on the ground before climbing the ladder. Second, place your ladder on flat, solid ground and secure it. Clip the C9 light clips onto each bulb. Third, work from one end of the roofline to the other, securing the clips onto the gutter lip or sliding them under the shingle edge. Finally, run the tail cord down a downspout and connect it to a watertight extension cord. Planning these steps guarantees a safe and professional setup.
Once your roofline lights are installed, test the display at sunset. Stand back at the street level to verify that each bulb is straight and aligned. Adjust any clips that have sagged. By planning and caring for every detail of your holiday lighting, you can design a beautiful, welcoming outdoor home that keeps your family safe and shines warmly throughout the holiday season.
Frequently Asked Questions
1. What is the difference between warm-white and cool-white holiday lights?
Warm-white lights (2700K) cast a soft, golden glow that mimics candlelight, creating a cozy and traditional look. Cool-white lights (6000K) cast a bright, blue-white light that looks modern and icy, but can look clinical if not styled correctly.
2. Can I connect different brands of LED lights together?
Yes, you can generally connect different brands of LED lights together if they use matching connectors and voltage. However, check the packaging to verify the total wattage does not exceed the maximum rating of the primary light string, preventing fuses from blowing.
3. How do I prevent my holiday lights from blowing fuses?
To prevent blown fuses, use energy-efficient LED lights, which use up to ninety percent less power than incandescent bulbs. Never connect more than the recommended number of light strings in a single line, and protect all plug connections from water.
4. What are watertight cord protectors and why do I need them?
Watertight cord protectors are plastic capsule covers that seal the plug connections between extension cords. They prevent rain, melting snow, and moisture from entering the plugs, blocking short circuits and preventing GFCI outlets from tripping.
5. Can I leave holiday light clips on my gutters year-round?
No, we recommend removing plastic light clips after the holiday season. Direct sunlight, heat, and winter freezing degrade the plastic, making the clips brittle and prone to breaking during the next installation, while trapping leaves in the gutters.
6. How do I wrap a tree trunk with lights?
Start at the base of the trunk and wrap the light strings tightly upward, keeping a spacing of three inches between wraps. Secure the strings with rubber zip ties to prevent sliding. Use conical 5mm LED lights for the best brightness and sparkle.
7. What electrical extension cords are safe for outdoor use?
Use heavy-duty, outdoor-rated extension cords labeled with “W” or “WA” (indicating weather resistance) and a thickness of 12 or 14 gauge. Choose green or black cords to blend in with your lawn and landscaping, keeping the display neat.
8. Can I hang holiday lights in the rain?
No, you should never install holiday lights during rain, snow, or wet conditions, as water can enter open plugs and sockets, creating severe shock hazards. Always wait for a dry, clear day to install and test your display.
9. How do I automate my outdoor lighting display?
Connect your main extension cords to a smart outdoor plug, like the Lutron Caseta. Connect the plug to your home Wi-Fi and program it to turn on automatically at sunset and turn off at midnight, saving energy and bulb life.
10. What is the advantage of commercial-grade lights over retail lights?
Commercial-grade lights feature thicker, heavy-duty wire insulation, screw-in replaceable bulbs, and waterproof sockets. They are highly durable, last for many seasons, and are much less prone to failures than standard retail light strings.
To learn more about optimizing your space, explore our guide on Smart Home Tech for Seniors.
For additional tips on creating a beautiful home, read our article about Non-Slip Flooring Solutions.
If you are planning a renovation, you might also find our ideas on Wheelchair Accessible Bathroom Design helpful.
To discover more sustainable choices, check out our tips on Grab Bars and Safety Features.